
This widget uses a total of 20 Icons but believe it or not it is super-fast and loads with in seconds. I merged all 20 Icons into one big image and used CSS Image stripes technique
to make the icons appear at right positions. Fortunately this saves a
lot of load time, because the browser will load all images at once and
doesn’t need to contact the image server several times for uploading the
images.
This is the big image I used,

Now lets add them below each post in blogger ,
- Go To Blogger > Layout > Edit HTML
- Search For ]]></b:skin>
- And paste the code below just above ]]></b:skin>
| /*--------MFS Bookmarking Widget (CSS#1)------*/ .MFS-bookmarking a { display:block; height:42px; width:48px; padding:0 9px; float:left; background:transparent url(https://blogger.googleusercontent.com/img/b/R29vZ2xl/AVvXsEiAHfPtR2YmxTFWKscThN2oNXbWMI1d6VSC327S-Mw5pYgr2yY6KPFFMMROmugVoAiHnDcT0fDVXzfhVRRGXt1iNf8M1eXfFH7L24oJqtfm0tOjNWsZsrZwcUUemWIjb4WhfcQjWY-_tvmy/s1600/flapper.jpg) no-repeat; } .MFS-bookmarking a.delicious { background-position:0px 0px; } .MFS-bookmarking a.delicious:hover { background-position:0px -43px; } .MFS-bookmarking a.digg { background-position:0px -86px; } .MFS-bookmarking a.digg:hover { background-position:0px -129px; } .MFS-bookmarking a.stumbleupon { background-position:0px -344px; } .MFS-bookmarking a.stumbleupon:hover { background-position:0px -387px; } .MFS-bookmarking a.technorati { background-position:0px -430px; } .MFS-bookmarking a.technorati:hover { background-position:0px -473px; } .MFS-bookmarking a.twitter { background-position:0px -516px; } .MFS-bookmarking a.twitter:hover { background-position:0px -559px; } .MFS-bookmarking a.facebook { background-position:0px -172px; } .MFS-bookmarking a.facebook:hover { background-position:0px -215px; } .MFS-bookmarking a.reddit { background-position:0px -258px; } .MFS-bookmarking a.reddit:hover { background-position:0px -301px; } .MFS-bookmarking a.yahoo { background-position:0px -602px; } .MFS-bookmarking a.yahoo:hover { background-position:0px -645px; } .MFS-bookmarking a.rss { background-position:0px -774px; } .MFS-bookmarking a.rss:hover { background-position:0px -817px; } |
4. Now Check the box “Expand Widget Templates” at the top-right-corner
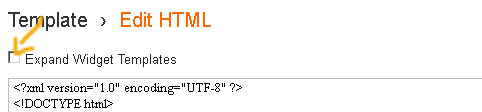
(Tip:- Press Ctrl + F)
5. Search for this code <data:post.body/> . If you can not find it then search for this one <p><data:post.body/></p>
6. Just below <data:post.body/> OR <p><data:post.body/></p>, paste this code,
| <!--MFS Bookmarking Widget (HTML)--> <div class='MFS-bookmarking'> <b:if cond='data:blog.pageType == "item"'> <br/><font color='#289728' face='ms sans serif' size='3'><b>Kindly Bookmark and Share it:</b></font> <br/><br/> <!-- Delicious --> <a class='delicious' expr:href='"http://del.icio.us/post?url=" + data:post.url + "&title=" + data:post.title' rel='external nofollow' target='_blank' title='Add this to Delicious :>'/> <!--DIGG--> <a class='digg' expr:href='"http://digg.com/submit?phase=2&url=" + data:post.url' rel='external nofollow' target='_blank' title='Digg this :>'/> <!--Stumble--> <a class='stumbleupon' expr:href='"http://www.stumbleupon.com/submit?url=" + data:post.url + "&title=" + data:post.title' rel='external nofollow' target='_blank' title='Stumble this :>'/> <!-- Technorati --> <a class='technorati' expr:href='"http://technorati.com/faves?add=" + data:post.url' rel='external nofollow' target='_blank' title='Fave this :>'/> <!-- Twitter --> <a class='twitter' expr:href='"http://twitthis.com/twit?url=" + data:post.url + "&title=" + data:post.title' rel='external nofollow' target='_blank' title='Tweet this :>'/> <!--Facebook--> <a class='facebook' expr:href='"http://www.facebook.com/sharer.php?u=" + data:post.url + "&t=" + data:post.title' rel='external nofollow' target='_blank' title='Share this on Facebook :>'/> <!-- Reddit --> <a class='reddit' expr:href='"http://reddit.com/submit?url=" + data:post.url + "&title=" + data:post.title' rel='external nofollow' target='_blank' title='Bookmark and tag this :>'/> <!-- Yahoo --> <a class='yahoo' expr:href='"http://myweb2.search.yahoo.com/myresults/bookmarklet?t=" + data:post.url + "&title=" + data:post.title' rel='external nofollow' target='_blank' title='Bookmark this :>'/> <a class='rss' expr:href='data:blog.homepageUrl + "feeds/posts/default"'/> </b:if></div> |
You can replace the bolded text in green with any statement you like. You can also change the text colour i.e #289728 with any colour you like. Use our Color Chart for this purpose.
7. Now Finally save your template and view your blog to see a colorful bookmarking widget just below all your posts :>
That’s All!
If you want larger icons approximately about 64px by 64px in size, then paste the following code just above ]]></b:skin> for Step#3 instead.
/*--------MFS Bookmarking Widget (CSS#2)------*/ .MFS-bookmarking a { display:block; height:55px; width:64px; padding:0 5px; float:left; position:relative; background:url(https://blogger.googleusercontent.com/img/b/R29vZ2xl/AVvXsEjDIH_RUTmNa5cTuZWfnzthcJJJY19Wwa3FaT4-H6Z-X1hnKnD6ATb0okumy92XcOAV0v13r6unuChTyD8U5SXp1RBwHXNiHFnJx_f3Rejx4Ce8nzcSCI27GuxiV_YWN_O42Ws-CoifU77J/s1600-h/flapper2.jpg) no-repeat; } .MFS-bookmarking a.delicious { background-position:0px 0px; } .MFS-bookmarking a.delicious:hover { background-position:0px -57px; } .MFS-bookmarking a.digg { background-position:0px -114px; } .MFS-bookmarking a.digg:hover { background-position:0px -171px; } .MFS-bookmarking a.stumbleupon { background-position:0px -228px; } .MFS-bookmarking a.stumbleupon:hover { background-position:0px -285px; } .MFS-bookmarking a.technorati { background-position:0px -570px; } .MFS-bookmarking a.technorati:hover { background-position:0px -627px; } .MFS-bookmarking a.twitter { background-position:0px -684px; } .MFS-bookmarking a.twitter:hover { background-position:0px -741px; } .MFS-bookmarking a.facebook { background-position:0px -456px; } .MFS-bookmarking a.facebook:hover { background-position:0px -513px; } .post-bookmark a.reddit { background-position:0px -342px; } .MFS-bookmarking a.reddit:hover { background-position:0px -399px; } .MFS-bookmarking a.yahoo { background-position:0px -798px; } .MFS-bookmarking a.yahoo:hover { background-position:0px -855px; } .MFS-bookmarking a.rss { background-position:0px -912px; } .MFS-bookmarking a.rss:hover { background-position:0px -969px; } |
For this tutorial I used “The Flapper” Icon Set
Do let me know how useful was this tutorial for you. Take care!